Author Archives: Admin

Get Dreamscene in Windows 8 or 8.1

What is DreamScene?

DreamScene was released on September 25, 2007 and introduced in Windows Vista. Using DreamScene users can set video content of MPEG, WMV, AVI formats as there desktop background. It was a really a cool feature. See the steps below to enable DreamScene or Video wallpaper in Windows 8 or 8.1. This also works in Windows 7 and Vista.

Steps to enable DreamScene in Windows 8:

1. Download & install DreamScene Video Wallpaper 2.23 software from here and install it.

You can download one sample dreamscene wallpaper from here

2. Double-click on the icon from desktop to launch the application.
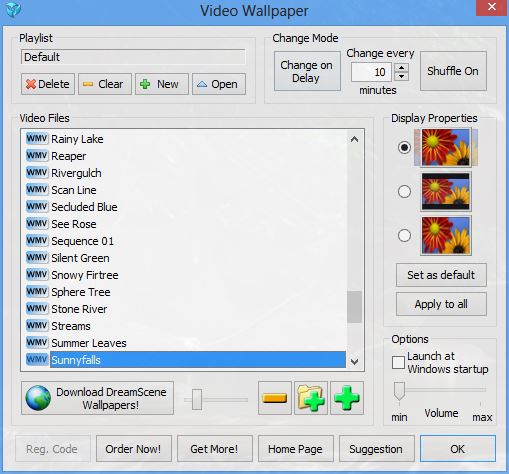
dreamscene
3. Click on the “Plus” icon (look above picture) to add downloaded sample dreamscene wallpaper to playlist. You are done!

You can click on “Launch at Windows startup” to start playing dreamscene automatically on windows startup.


How to create HTML sitemap page for your blog within seconds

A site map (or sitemap) is a list of pages of a web site accessible to crawlers or users. It can be either a document in any form used as a planning tool for Web design, or a Web page that lists the pages on a Web site, typically organized in hierarchical fashion.

Just follow these steps to create sitemap page for your blog

1. Open your blogger account and navigate to

Pages >> New page

2. Switch to HTML mode from Compose mode

3. You can remove any HTML tags in the page that appear as default and paste the below code

<script type=”text/javascript”>

var numposts = 100;

var standardstyling = true;

function showrecentposts(json) {

for (var i = 0; i < numposts; i++) {

var entry = json.feed.entry[i];

var posttitle = entry.title.$t;

var posturl;

if (i == json.feed.entry.length) break;

for (var k = 0; k < entry.link.length; k++) {

if (entry.link[k].rel == ‘alternate’) {

posturl = entry.link[k].href;

break;

}}

posttitle = posttitle.link(posturl);

if (standardstyling) document.write(‘<li>’);

document.write(posttitle);}

if (standardstyling) document.write(‘</li>’);

}

</script>

<ul>

<script src=”https://TechiPickBlog.com/feeds/posts/default?orderby=published&amp;alt=json-in-script&amp;callback=showrecentposts&amp;max-results=999″></script>

</ul>

4. Replace  https://TechiPickBlog.com with your own blog address.

Click preview to see your sitemap and publish it 🙂

See the sitemap of this blog here


Force windows to use 100% of available bandwidth

Bandwidth is usually controlled by your Internet Service Provider (ISP). Sometimes there are software elements that influence your internet connection speed. Once such factor is QoS (Quality of Service), for example Windows Update, streaming videos or audio, Voip applications, etc. – anything that makes use of the QoS Packet Scheduler.

 
The reservation is 20% in Windows Xp, Vista & 7 and it is 80% on windows 8 and latest versions. We have the option to disable this reserved bandwidth to get access to 100% of your bandwidth. However, please take note that the 20% reserved bandwidth is only used when QoS applications need it. By configuring its setting in the Group Policy, you can easily limit the reservable bandwidth.


Steps:
1. Open Run or cmd window and type gpedit.msc and press enter on your keyboard.

Capture

 
2. Now Local Group Policy Editor will open and navigate to Computer Configuration -> Administrative -> Network -> Qos Packet Scheduler.

 
3. Double click on Limit Reservable bandwidth. It will say it is not configured, but the truth is under the ‘Explain’ tab. i.e.”By default, the Packet Scheduler limits the system to 80 percent of the bandwidth of a connection, but you can use this setting to override the default”. Click too ENABLE reservable bandwidth, then set it to 0 (ie. 0%).

 
4. Restart your PC to effect the changes


Using Windows regisrty:
1. Open Run or cmd window and type regedit in the search box and press Enter on your keyboard.

 
2. In Regedit click your way through HKEY_LOCAL_MACHINE\SOFTWARE\Policies\Microsoft\Windows

 
3. Right click on the Windows map and select New and Key from the dropdown menu and name the new map Psched

 
4. Double-click on the new Psched map and right click in the empty white screen on the right

 
5. Select New and DWORD (32-bit) Value from the dropdown menu

 
6. Name the new Dword Value NonBestEffortLimit

 
7. Right-click on your new NonBestEffortLimit key and select Modify from the dropdown menu

 
8. In the Value Data field make sure the value is 0 so the reserved bandwidth percentage is set to 0%.

 
9. Click OK and restart your PC to make the changes