Enable or Disable USB Devices on computer

Disabling USB devices is one of the effective methods to prevent confidential information leaks, data theft, and to protect computers from malicious files. USB devices are often used by perpetrators, and that is why it is important to protect the computer and the network from intrusion via USB ports.

METHOD 1: Using Registry editor

1. Press the Windows + R keys to open the Run dialog, type regedit, and press Enter.

2. If prompted by UAC, then click/tap on Continue (Vista) or Yes (Windows 7/8).

3. In regedit, navigate to the location below.

HKEY_LOCAL_MACHINE\SYSTEM\CurrentControlSet\services\USBSTOR

4. To Enable USB Storage Devices in Windows

A) In the right pane of USBSTOR, double click/tap on Start to modify it.
B) Type in 3, click on OK, and go to step 6 below.

5. To Disable USB Storage Devices in Windows

A) In the right pane of USBSTOR, double click on Start to modify it.
B) Type in 4, click on OK, and go to step 6 below. (see screenshot below step 5B)

6. Close regedit.

METHOD 2: Using Device manager

DisableEnableUSB

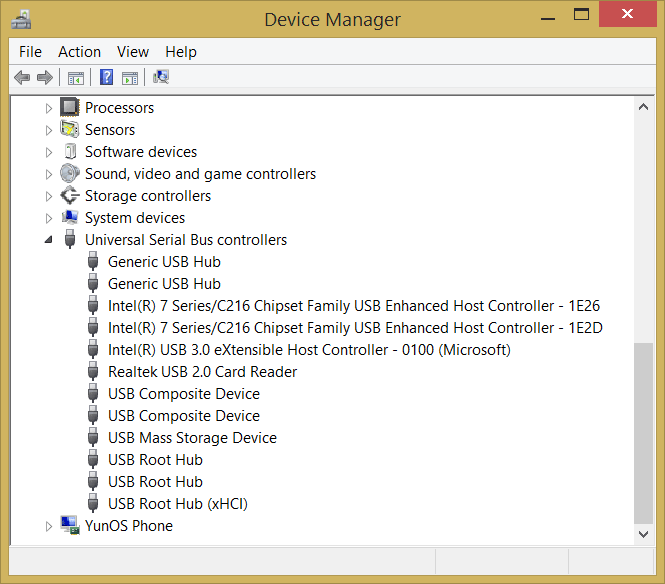
1. Go to Device Manager (Right click My Computer, choose Manage, choose Device Manager in left pane).
2. Now look for USB Devices in the right pane, right click on the device and choose disable.

Hack Software Trial Period and Run Forever

Most of us are familiar with many software programs that run only for a specified period of time in the trial mode. Once the trial period is expired, these programs stop functioning and demand for a purchase. However, there is a way to run the software programs so that they function beyond the trial period.

When the software programs are installed for the first time, they make an entry into the Windows Registry with the details such as Installed Date and Time, installed path etc. After the installation, every time you run the program, it compares the current system date and time with the installed date and time. With this, it can make out whether the trial period is expired or not.
So, with this being the case, just manually changing the system date to an earlier date will not solve the problem. For this purpose there is a small tool known as RunAsDate.
RunAsDate is a small utility that allows you to run a program in the date and time that you specify. This utility doesn’t change the current system date and time of your computer, but it only injects the date/time that you specify into the desired application.

You can run multiple applications simultaneously, each application works with different date and time, while the real date/time of your system continues to run normally.
RunAsDate intercepts the kernel API calls that returns the current date and time (GetSystemTime, GetLocalTime, GetSystemTimeAsFileTime), and replaces the current date/time with the date/time that you specify.
You can download RunAsDate from here: Download RunAsDate


Steps:

You will have to follow these tips carefully to successfully hack a software and make it run in the trial mode forever:
Note down the date and time, when you install the software for the first time.
Once the trial period expires, you must always run the software using RunAsDate.
After the trial period is expired, do not run the software(program) directly. If you run the software directly even once, this hack may no longer work.
It is better and safe to inject the date of the last day in the trial period.
For example, if the trial period expires on jan 30 2013, always inject the date as jan 29 2013 in the RunAsDate.


Alternative method 1: Using Crack Lock Software

Download Crack Lock from Here And follow the steps given below
Step 1: Always note down the date and time, when you install a trial software for the first time.

Step 2: Once the trial period expires, never open it
Step 3: Now open Crack Lock which we downloaded earlier and select add program
Step 4: Now navigate and select the trial software which you want to use it forever and Inject the date of the last day in the trial period.
eg: If the trial period expires on December 30 , always inject the date as December 29

Step 5: Follow the same steps to use any Trail version programs for ever
Note :- Once the trial period of the program expires never open it directly always open the program using crack lock.


Alternative method: Step 2: Manually Bypassing Software’s Trial Period>/u>

This trick generally works for most of the 3rd party applications, here we won’t use any kind of time stopper or lame stuff like that. What we will do is clear tracks so that app doesn’t realize we used the software before uninstalling it and are reinstalling it.

Step 1: First thing to do is uninstall the application.
Step 2: Go to Start Type “Regedit”.
Step 3: Go to HK Local Machine -> Software -> Your Software name. Delete the Key.
Do this for HK Current user if there exists a key of that software.
Step 4: Go to run type “%temp%. Delete all files. Well they are just temporary files so it won’t matter, it will only clean up ur pc little bit if not anything else.
Step 5: Go to Users -> Username -> Appdata Check all 3 directories that is “Local”, “LocalLow”, “Roaming” for your software entry. Delete that.
Step 6: Reinstall application and enjoy the next trial. Just perform this every time trial expires.

Done!


Enable Right click and copy text from a right-click disabled web page

You might have seen some website is right click protected and disabled copying its contents. Copy-pasting some body else work is very common. Though, very few people actually give the credit link or mention about the source. Specially, in Blogging people copy each other content and increase plagiarism. Apart from all Auto-blogging tool, most common form of copying a page is by selecting text > mouse right-click and copy the content. In WordPress, we can easily disable this by using disable right click WordPress plugin.

Many websites disable CTRL +C options to ensure better security from hackers and malicious sites. Its quite annoying, you don’t realize just how much you use right-click until you can’t use it! There are a lot of useful features in the short menu that it opens up. While most are also available in the main browser menu, it’s often much quicker to use the right-click menu — this is usually the closest menu you have available. By simply disabling your browser java script temporarily, you can remove these protections. Follow these steps according to your browser.


Internet Explorer Browser:

Goto Tools>Internet options>Security

Now Click on Custom Level

Now find Scripting Section it will be around the end.

Now disable Active Scripting.This will disable JavaScript and vbscript in your browser.

Click on OK.

Now restart your browser

Mozilla Firefox Browser:

Goto Tools>Options>Content

Uncheck the box Enable JavaScript

Click Ok

Open the website that have blocked your right click.

Google Chrome Browser:

Click on the Wrench Icon on the top right side on your browser.

Click on Options

Click on Show advanced seettings…

Click on Content Settings and then on JavaScript

Disable java script and open the website.

There are a many other tricks to disable blocked right click. I have shown the most basic trick that you can use anywhere without any special software.